Quality
Criteria
The following quality criteria will help to decide, if an eyepiece is a
“good” or a “bad” one. On our product pages we present the results of our
investigations for each eyepiece according to following criteria.
-
Sharpness
One of the most significant, but also a minimum requirement, is the ability of
the eyepiece to deliver a sharp image. An eyepiece, which produces blurred
images is wasted money.
But what does “sharpness” mean exactly?
The human eye is able to recognize two points as single points, if the distance
between them is bigger than about 1 arc minute. Therefore the eyepiece will
give the impression of a perfectly sharp image, if it is able to resolve one
arc minute – in relation to its apparent field of view, of course. If it is
better: no chance to verify it by your own eyes. If it is worse, you will have
the impression of a blurred image. However, the magnification has to fit to the
telescope. The most expensive and perfect eyepiece will not deliver a sharp
image on a telescope with a 50mm objective at a magnification of 400. Have a
look at our basic formula section.
-
Edge Sharpness
Most eyepieces have a good sharpness along the optical axis. But look to the
edges of your field of view, and you will find differences. Of course, you can
use eyepieces with poor edge sharpness for e.g. planetary observations, but if
buying a wide angle eyepiece you really would like to have a fully useable
field of view – otherwise you could take (cheaper) eyepieces with smaller field
of view. A lack of edge sharpness is not necessarily due to the eyepiece. You
have to look for the whole system, and especially for longer focal lengths of
the eyepiece, huge apparent field of views and fast telescopes (Newtonians with
F/4, F/5) the telescope itself is the limiting factor. Some eyepieces are
really sensitive to fast systems and do not perform well there, but on F/8 they
are perfect. Other eyepieces, unfortunately but not unexpected the high-priced
Pentax et. al., are quite well even on fast systems. We give some hints on our
product pages, which eyepiece may be used for which focal ratios.
Sharpness is a good measurable, quantitative and impartial parameter. We
perform our measurements in the following way:
The eyepiece under test is mounted behind a 135mm Vivitar telephoto lens (for
SLR cameras). Such a telephoto lens is perfect for these measurements as it is
corrected to produce a focused image on a plane surface, even at a focal ratio
of F/2.8. That is what we want, because we would like to measure the eyepiece,
not effects of the telescope. A resolution target (see below) is placed in
about 1.5m distance, and the system is focused on this target. We now look for
the tiniest lines which can be identified as separate lines. A table associated
to the target now tells us the resolution in mm. The resolution in arc minutes
can be calculated using a conversion from the apparent field of view to mm.
This procedure is done for a couple of points along a line from the optical
axis to the edge of the field of view, and therefore a sharpness diagram (Fig.
2) can be printed. As it is the eye, which is used for the resolution
determination, the result can never be better than approx. one arc minute, but
as described above, even if the eyepiece would perform better, you would not have
any chance to see a difference on your telescope.
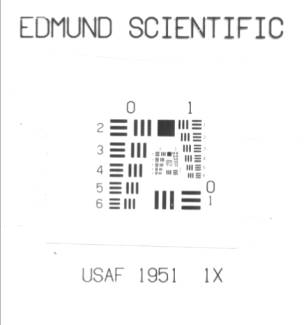
Figure 1: USAF Resolution
Target.
The tiniest group of vertical and horizontal lines, which can be identified as
separate lines, gives the achieved resolution in mm.
Figure 2: Sharpness
Diagram of a 9mm Super Ploessl versus apparent field of view. Blurring
increases from green to red. The value of 1.1 arc minutes on the optical axis
is good, but outside of 17° around this axis the eyepiece shows noticeable
decrease in performance. From the sharpness quality the eyepiece is not too
bad, but there are better ones. You will find those diagrams for each eyepiece
on the product pages.
-
Apparent Field of View
We do not rely on manufacturer data – and you shouldn’t do also. We check the
data by measuring the apparent field of view and give our comments and test
results.
-
Contrast, Colour and Chromatic Errors
These properties are more difficult to describe in a quantitative way. However,
we use our measurement device combined with a colour target (Fig. 3 and 4) to
get a subjective description of the image quality. We use a very good eyepiece
for comparison.
Good contrast is mainly achieved by a high-quality multi-coating of all optical
surfaces (what is called fully multi-coated). These coatings increase the
transmission coefficient (you get a brighter image), but more important is the
fact, that reflexes and scattered light are reduced to a minimum. Therefore the
background will become darker, and contrast increases. Chromatic errors result
from different refractive indices for different wavelength. This can be
minimized by using different kinds of glass, which can be combined in a way
that they compensate these errors in the sum. It does not work perfect in any
case, so mainly close to the edges you may see chromatic errors, which reduce
contrast and sharpness.
-
Aberration: Distortion and Field Curvature
With the same target we look for distortion (a square looks like a barrel or a
cushion) and for field curvature. In the case of field curvature you can bring
the eyepiece in focus either in the centre or at the edges, but not over the
complete field of view.
-
Eye Relief
The eye relief is mainly, but not just the distance from the eye lens to the
eye itself. Eyepieces with short focal length usually have a short eye relief,
which makes it difficult or at least needs getting used to look into. There are
special eyepieces available with have a large eye relief (15 to 20mm), and they
are well suited if you need to wear glasses during observations. However, even
if the eye relief is large, there may be effects (e.g. kidney-beaning) which
make it hard to have a relaxing view into the telescope.
-
Mechanical Quality
Our impression of how the eyepiece is manufactured apart from the optical
quality. We look for the materials used, surface coating, rubber eye cup etc.
After this two examples about differences between eyepieces – as an
indication, that quality differences can be made visible and that quality can
be judged at least in some points in an impartial way.
However, we would like to point out here, that such a sharpness diagram
is not telling you everything about the eyepiece. Think also about the
following:
-
The optical system does not consist of the single eyepiece, but also of
the objective lens or mirror, and may be other components. If something is
wrong on that side, the best eyepiece will not help. Especially for fast
Newtonians you have to expect edge blurring and Newtonian coma. That is why we
add some words concerning use on fast systems.
-
Surely there is some spread in the manufacturing of eyepieces. For the
test it may be that we got a very good one or a bad one. We think that this
spread is a minor effect, but there are no guarantees out of our diagrams.
Please use our sharpness diagrams carefully. You can take them as a help
for your decision, but they are not the philosopher's stone.
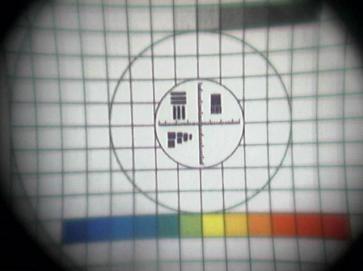
Figure 3: Bad orthoscopic
(!) 4mm-eyepiece of a well-known USA-manufacturer – we just can tell you that
this eyepiece is about 25 years old, so please make no conclusions to
up-to-date products. The eyepiece is a good example, as it combines nearly all
errors: Bad sharpness also on the optical axis, completely blurred at the
edges, field curvature, and cushion distortion. Even chromatic errors can be seen.
The sharpness diagram on the right is therefore deterrent, also the view
through the telescope.
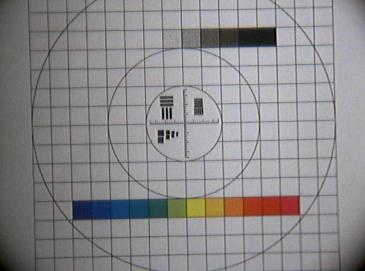
Figure 4: Much better: a
15mm Ploessl, even not expensive, is a fine one. Very good sharpness over the
complete field of view, no visible distortion, very good contrast. The
sharpness diagram is according to that image: sharp to the edges.